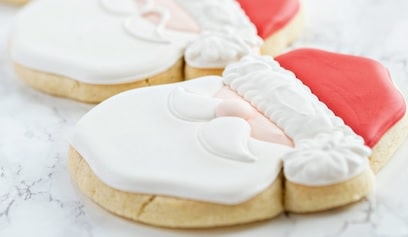
When most people think of decorated cookies, they think of Christmas. Although that may be reasonable, I have a whole business that proves decorated cookies are popular and festive all year long. Nevertheless, Christmas cookies still reign supreme, and we churn out more Santa Claus cookies than I can count. I originally created these simple Santa faces as a way to quickly turn out Mr. Claus during our busiest month of the year but later came to appreciate its simplicity; you will apply the same principles we go over in this chapter to different character cookies.
Eyes are hard. I said it. It’s hard to create that perfect cartoon eye, and before you know it, you’ll have a tray of cookie faces with hundreds of eyes looking at you. Trust me, nightmares may occur! I wanted to teach you
these Santa faces to show you that even though there are no eyes, no one will doubt that it is a Santa Claus cookie.
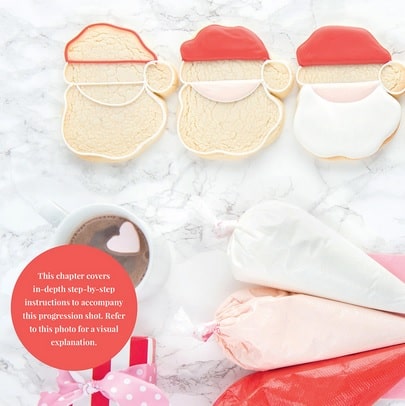
These are the most in-depth cookies in the book. Please refer to the photos of the Santa in sequential order. Keep in mind Santa Claus is coming to town no matter what your cookies look like, so don’t let this be an added stress during the holiday buzz. Have some eggnog and buckle up. North Pole, here we come!
.
.
.
INGREDIENTS:
•Santa face-shaped cookies
•A batch of Royal Icing
•Needle tool
•Airtight container, for storage
•Icing in AmeriColor’s “Bright White,” “Super Red”, and “Copper (Flesh Tone),” in both pipe and flood consistencies
METHOD:
1.Cut and bake off your Santa faces. These principles can be applied to a variety of Santa face cookie cutter shapes. Let cookies cool completely on the tray, rearrange the cool cookies to the outer edge of the tray for easier decorating.
2.Make a batch of Royal Icing. You will need both pipe and flood in “Bright White,” “Super Red” and “Copper (Flesh Tone).” All of these colors are AmeriColor gels. Use a very small amount of copper mixed with warm brown; the amount is dependent on what skin tone you are trying to achieve. Always keep your copper to a minimum—Santa does not need a spray tan. Remember that icing dries a shade darker, so your red should look about a shade lighter than your desired final shade. Mix colors and fill piping bags, cutting the standard amount off the tip for both the pipe and flood bags.
3.To keep all your Santa faces uniform, work in the same order on each cookie, starting at the top. Outline the hat in red. Pipe a circle in white for the puffy ball, and add a white band to fill in later as the fur trim. Still using white piping, add a semi-circle for the face at the bottom of the fur trim gap. Finally, outline the beard at the edge of the cookie to complete the piping.
For reference, this is the first
cookie on the left, and each step from now on will move one cookie to the right.
5.Once the skin tone icing is set, flood the beard in white. We want the fur trim to have some texture, so instead of filling in the trim with flood consistency, we are going to use pipe! Yes, pipe! Starting on the top edge next to the hat, pipe in a small swirling motion all the way across, repeating in rows until the band for the fur trim is full. Use your needle tool to mix around the lines, adding more texture and breaking up any uniform lines that might have crept in.
The fur band will NOT be smooth, and that is exactly the texture we are going for. Let cookies set before moving on.
6.Using the same technique from the fur trim, fill in the puffy ball with white piping icing. Attempt to add a little more icing to the ball so it stands out against the fur trim; there should be a clear difference in texture between the two. While you’re still holding onto the white piping icing, draw your best mustache. Start from the center of the face covering the bottom semi-circle; this will create the illusion of cheeks. Immediately fill in the ’stache with your white flooding.
7.Final step! Once the mustache is set, use your skin tone piping bag to create a nose on the top center of the mustache. This should be a large three-dimensional dot; use your needle tool to soften any sharp edges.
Santa has come to town in seven steps! There is a lot more patience involved in letting the cookies set than technical skills used on these cookies, proving that anyone can make character cookies! Make sure the cookies are completely dry before storing in an airtight container.
Are you excited to include your Santa cookies on your cookie platter? What if I told you that you could also include your note to Santa, too? Behold the beauty of edible markers. I know, you’re thinking we can’t get through a chapter without adding another tool. Kind of true, but I believe these are a great investment and something easy to play with, not to mention that these are perfect for kiddos.
There is something special about setting out cookies and a note for Santa. We used the same plate through my entire childhood even though it only had three of the four kids’ names on it, tough luck, little sis! We’re here to start a new tradition of edible notes that Santa will love!


Comments
Post a Comment